_
A Developer Who Always Skipped the SEO Part
As a developer, I have run into SEO concepts more times than I can count. I understand why server-side rendering matters — I am actually responsible for it on one of my commercial projects. I know why semantic markup exists. When an SEO audit lands on my team, I am usually the one who ends up implementing the changes. I have done this work before.
But I never really went deep into the why behind all of it. I was following requirements, not understanding the system. That changed when I built this blog — the one you are reading right now. Because this time I actually care about the outcome. I want this site to help my career grow, which means people need to find it. The content I write here needs to show up when someone searches my name, my handle, or the topic of an article. So for the first time I sat down and went through every piece of SEO from the beginning, not as a task someone handed me, but as something I wanted to understand. This post is that walkthrough.

A quick note before we start. This is not a guide for ranking a SaaS landing page or competing for high-value keywords. This is an SEO setup for a personal blog, where the realistic goals are: be findable by name, get blog posts indexed quickly, and look correct when someone shares a link in a chat. Different game.
What SEO Actually Is
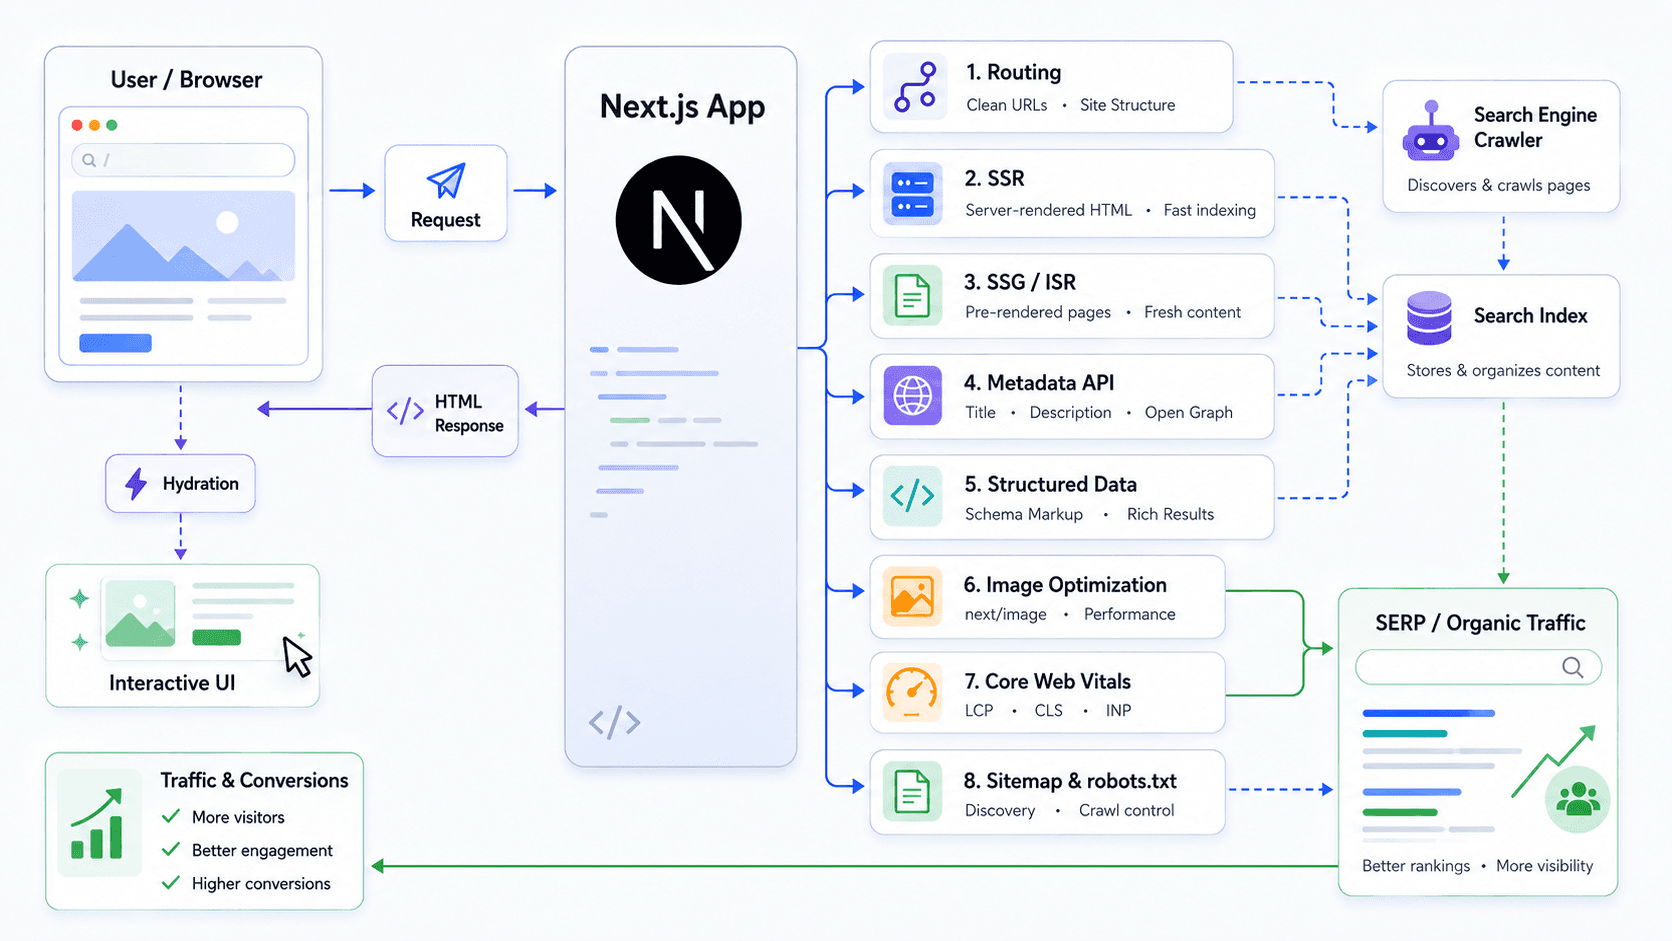
Simply put — it is a way to tell search engines what your page is about, so they can show it to the right people at the right time. When you publish something, Google does not just magically know it exists. A crawler visits your page, reads the HTML, and tries to understand: what is this, who made it, what is it about, is it trustworthy? Based on that, it decides whether to index it and where to rank it.
Step 1: SSR
Search engine crawlers generally do not execute JavaScript.
They request a URL, get an HTML response, and read what is there.
A typical React SPA returns an empty <div id="root"> with script tags — the crawler sees nothing useful.
Your content only appears after JS runs on the client — and the crawler never runs it.
The fix is pre-rendering — whether that is SSR, SSG, or something in between, the server must return HTML that already contains the content. There are many ways to achieve this, but in the React ecosystem the most popular choices are Next.js and Gatsby — both handle SSR out of the box and come with the SEO tooling already built in. I built this blog on Next.js, so the code examples here are in Next.js — but everything described works the same way in any SSR framework.
Step 2: Semantic HTML
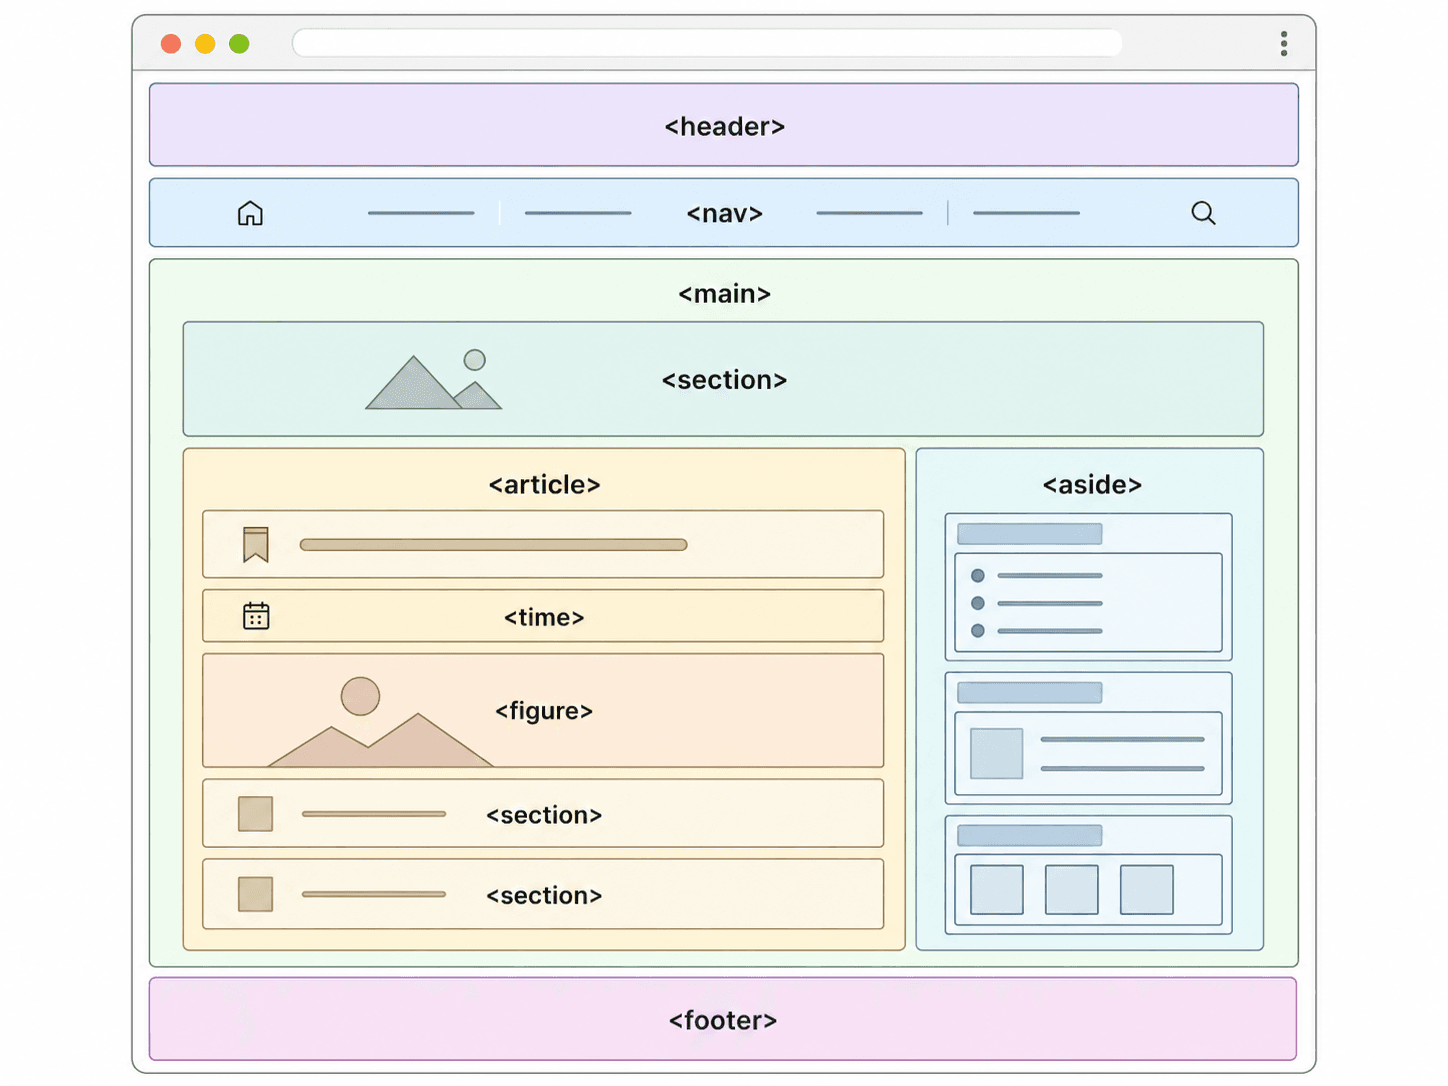
The next step is semantic HTML — using tags that carry meaning, not just structure.
<div> is a box. It groups things visually, but tells the crawler nothing.
<article>, <nav>, <main>, <time> — these tags describe what the element actually is.
That matters because a crawler needs to understand which part of the page is worth indexing,
which is navigation, and which is a footer that repeats everywhere and can be skipped.
Here is what a well-structured blog post page looks like in plain HTML:
<html lang="en">
  <head>
    <!-- meta tags, title, canonical... -->
  </head>
  <body>
    <header>
      <nav>...</nav>
    </header>

    <main>
      <article>
        <h1>Post title</h1>
        <time dateTime="2026-06-04">June 4, 2026</time>

        <h2>Section heading</h2>
        <p>Content...</p>
      </article>
    </main>

    <footer>...</footer>
  </body>
</html>
In Next.js, a good place to define the base semantic structure is
the root layout — <header>, <main>, and <footer> elements wrap every page automatically.
One important rule: there must be exactly one <main> per page.
export default function RootLayout({ children }) {
  return (
    <html lang="en">
      <body>
        <Header />
        <main>{children}</main>
        <Footer />
      </body>
    </html>
  );
}
For blog posts, the right tag is <article> — it signals that this is
a standalone piece of content with its own title, date, and body.
return (
  <article>
    <header>
      <h1>{post.title}</h1>
      <time dateTime={post.date.toISOString()}>{post.dateLabel}</time>
    </header>
    <ArticleContent />
  </article>
);
The same logic applies to dates. A <span>June 4, 2026</span> looks fine visually,
but the crawler cannot reliably parse it as a date.
<time dateTime="2026-06-04"> solves that — the visible text can be anything,
and the machine-readable value lives in the attribute.
<time dateTime={dateTime} className="text-secondary text-sm">
  {date}
</time>
A couple more things. Set lang on <html> to the language of your content — crawlers use it for regional indexing.
Use one <h1> per page, then <h2> and <h3> for sections.
Heading order matters: search engines build a content outline from it, so keep the hierarchy logical.
Step 3: Meta Tags
Meta tags live inside <head> and are invisible to the user, but they are the main way you communicate with search engines and social platforms. They tell Google what the page is called, what it is about, who wrote it, and what URL is the canonical version. They also control how the page looks when someone shares a link in Telegram or LinkedIn.
Here are the most important ones:
<title>— the blue clickable headline in Google search results<meta name="description">— the gray text snippet underneath it<link rel="canonical">— tells Google which URL is the real version, prevents duplicate indexing<meta name="robots">— indexing instructions:index/noindex,follow/nofollow, and Googlebot-specific hints likemax-image-preview: largeormax-snippet: -1<meta name="keywords">— Google largely ignores this for ranking, but it is still useful for one specific case: matching name queries in non-Latin scripts. If your name exists in Cyrillic (Хвищук) and your site content is in English, putting the Cyrillic variants inkeywordshelps search engines connect the dots. For anything else, it does nothing.<meta name="author">— who wrote the page; contributes to E-E-A-T signals<link rel="alternate" hreflang="...">— for multilingual sites, tells Google which language version to show in which region<meta property="og:*">— Open Graph tags for social sharing previews (covered separately in the next step)
Here is what a standard HTML page head should look like:
<head>
  <title>Yurii Khvyshchuk | Blog</title>
  <meta name="description" content="Writing on software engineering and web development." />
  <meta name="keywords" content="Yurii Khvyshchuk, yuragon, software engineer" />
  <meta name="author" content="Yurii Khvyshchuk" />
  <link rel="canonical" href="https://yuragon.dev/blog" />
  <meta name="robots" content="index, follow" />
</head>
For a blog post, you want to add the publish date and mark the type as article:
<head>
  <title>Simple JWT Authentication in Node.js | Yurii Khvyshchuk</title>
  <meta name="description" content="A minimal JWT auth flow for Node.js — registration, login, and protected routes." />
  <meta name="keywords" content="Node.js, JWT, authentication, bcrypt, Express" />
  <link rel="canonical" href="https://yuragon.dev/blog/simple-jwt-authentication-nodejs" />
  <meta name="article:published_time" content="2026-06-02T00:00:00.000Z" />
  <meta name="article:author" content="Yurii Khvyshchuk" />
</head>
In Next.js you do not write these tags by hand. You export a metadata object from any page.tsx and the framework generates the correct HTML. I keep the site-wide defaults in one file so every page inherits them and only overrides what is specific to that route.
export const defaultMetadata: Metadata = {
  metadataBase: new URL("https://yuragon.dev"),
  title: {
    default: "Yurii Khvyshchuk | Home",
    template: "Yurii Khvyshchuk | %s",
  },
  description: "Yurii Khvyshchuk (yuragon, yurkagon) — software engineer...",
  applicationName: "yuragon.dev",
  authors: [{ name: "Yurii Khvyshchuk", url: "https://yuragon.dev" }],
  creator: "Yurii Khvyshchuk",
  publisher: "Yurii Khvyshchuk",
  category: "Technology",
  keywords: [
    "Yurii Khvyshchuk",
    "yuragon",
    "yurkagon",
    "Юрій Хвищук",
    "Хвищук",
    "software engineer",
    "typescript",
    "react",
    "next.js",
  ],
  alternates: {
    canonical: "https://yuragon.dev",
    languages: {
      "en-US": "https://yuragon.dev",
      "x-default": "https://yuragon.dev",
    },
  },
  robots: {
    index: true,
    follow: true,
    googleBot: {
      index: true,
      follow: true,
      "max-video-preview": -1,
      "max-image-preview": "large",
      "max-snippet": -1,
    },
  },
};
import { defaultMetadata } from "@/constants/seo";

export const metadata = defaultMetadata;

export default function RootLayout({ children }) {
  return (
    <html lang="en">
      <body>
        <Header />
        <main>{children}</main>
        <Footer />
      </body>
    </html>
  );
}
The title.template is worth calling out — when any page sets title: "Blog",
Next.js automatically expands it to Yurii Khvyshchuk | Blog.
No need to repeat the site name on every page.
The keywords array includes Cyrillic name variants for the same reason explained above — cross-script name matching.
For individual pages I use a small helper that sets the title, description, and canonical URL in one call:
export const createPageMetadata = ({
  title,
  description,
  path,
}: {
  title: string;
  description: string;
  path: string;
}): Metadata => ({
  title,
  description,
  alternates: { canonical: `${WEBSITE_URL}${path}` },
});
export const metadata = createPageMetadata({
  title: "Blog",
  description: "Writing on software engineering and web development.",
  path: "/blog",
});
For blog posts the metadata is generated dynamically — each post provides its own title, description, and tags from its frontmatter:
export async function generateMetadata({ params }): Promise<Metadata> {
  const post = await BlogService.getBySlug(params.slug);

  return {
    title: post.title,
    description: post.description,
    keywords: [...post.tags, ...post.seoTags],
    alternates: { canonical: `${WEBSITE_URL}/blog/${post.slug}` },
  };
}
Step 4: Sitemap
A sitemap is an XML file that lists all the URLs on your site. Instead of discovering pages by following links, Google reads the sitemap and immediately knows what to crawl. Here is what it looks like:
<?xml version="1.0" encoding="UTF-8"?>
<urlset xmlns="http://www.sitemaps.org/schemas/sitemap/0.9">
  <url>
    <loc>https://yuragon.dev</loc>
    <lastmod>2026-06-04T18:00:00.000Z</lastmod>
    <changefreq>weekly</changefreq>
    <priority>1.0</priority>
  </url>
  <url>
    <loc>https://yuragon.dev/blog/practical-seo-setup-for-a-personal-blog-in-nextjs</loc>
    <lastmod>2026-06-04T00:00:00.000Z</lastmod>
    <changefreq>yearly</changefreq>
    <priority>0.7</priority>
  </url>
</urlset>
Each <url> entry has four fields:
<loc>— the full URL of the page, required<lastmod>— when the page was last meaningfully changed. Google ignores this if it is the same for all URLs or matches the build time — it treats that as unreliable. For blog posts, use the actual publish date; for static pages, you can omit it<changefreq>— a hint for how often the page changes (weekly,monthly,yearly). Google does not follow this strictly, but it helps signal which pages are worth re-crawling more often<priority>— a relative importance score from 0.0 to 1.0, compared only within your own site. The home page typically gets1.0, main sections0.8–0.9, blog posts0.7
In Next.js you do not write this file by hand. Create src/app/sitemap.ts and export a function — Next.js generates the XML automatically and serves it at /sitemap.xml.
import type { MetadataRoute } from "next";

import { BlogService } from "@/services/BlogService";

const staticRoutes = [
  { path: "/", changeFrequency: "weekly", priority: 1.0 },
  { path: "/about", changeFrequency: "monthly", priority: 0.9 },
  { path: "/blog", changeFrequency: "weekly", priority: 0.9 },
  { path: "/projects", changeFrequency: "monthly", priority: 0.8 },
];

export default async function sitemap(): Promise<MetadataRoute.Sitemap> {
  const staticEntries = staticRoutes.map((route) => ({
    url: `https://yuragon.dev${route.path}`,
    changeFrequency: route.changeFrequency,
    priority: route.priority,
  }));

  const posts = await BlogService.getAllSorted();
  const postEntries = posts.map((post) => ({
    url: `https://yuragon.dev/blog/${post.slug}`,
    lastModified: post.date,
    changeFrequency: "yearly",
    priority: 0.7,
  }));

  return [...staticEntries, ...postEntries];
}
Step 5: Robots.txt
robots.txt is a plain text file at the root of your domain that tells crawlers which parts of the site they are allowed to visit.
It is the very first thing a crawler checks before it reads anything else.
You use it to allow indexing of public pages and block anything that should not appear in search — like API routes or admin panels.
Here is what a standard robots.txt looks like:
User-Agent: *
Allow: /
Disallow: /api/

Host: https://yuragon.dev
Sitemap: https://yuragon.dev/sitemap.xml
User-Agent: *— applies these rules to all crawlersAllow: /— allow access to the entire siteDisallow: /api/— block the API routes from being indexedSitemap— points the crawler directly to your sitemap
In Next.js, create src/app/robots.ts and export a function — same convention as sitemap.ts:
import type { MetadataRoute } from "next";

export default function robots(): MetadataRoute.Robots {
  return {
    rules: [{ userAgent: "*", allow: "/", disallow: ["/api/"] }],
    sitemap: "https://yuragon.dev/sitemap.xml",
    host: "https://yuragon.dev",
  };
}
Step 6: RSS Feed
An RSS feed is an XML file that lists your blog posts in a standard format. Feed readers like Feedly subscribe to it and notify users when you publish something new. Google also reads RSS feeds during crawling and uses them as an additional discovery signal.
Here is what it looks like:
<?xml version="1.0" encoding="UTF-8"?>
<rss version="2.0" xmlns:atom="http://www.w3.org/2005/Atom">
  <channel>
    <title>yuragon.dev</title>
    <link>https://yuragon.dev</link>
    <description>Writing on software engineering by Yurii Khvyshchuk.</description>
    <language>en-US</language>
    <atom:link href="https://yuragon.dev/rss.xml" rel="self" type="application/rss+xml" />

    <item>
      <title><![CDATA[Simple JWT Authentication in Node.js]]></title>
      <link>https://yuragon.dev/blog/simple-jwt-authentication-nodejs-mongodb</link>
      <guid isPermaLink="true">https://yuragon.dev/blog/simple-jwt-authentication-nodejs-mongodb</guid>
      <pubDate>Mon, 02 Jun 2026 00:00:00 GMT</pubDate>
      <description><![CDATA[A minimal JWT auth flow for Node.js.]]></description>
      <author>Yurii Khvyshchuk</author>
    </item>

    <item>
      <title><![CDATA[Why I Chose MDX for My Next.js Portfolio Blog]]></title>
      <link>https://yuragon.dev/blog/why-i-chose-mdx-for-my-nextjs-portfolio-blog</link>
      <guid isPermaLink="true">https://yuragon.dev/blog/why-i-chose-mdx-for-my-nextjs-portfolio-blog</guid>
      <pubDate>Tue, 27 May 2026 00:00:00 GMT</pubDate>
      <description><![CDATA[How MDX became the simplest way to write blog content in a Next.js portfolio.]]></description>
      <author>Yurii Khvyshchuk</author>
    </item>
  </channel>
</rss>
Same pattern as sitemap.ts — a Route Handler at src/app/rss.xml/route.ts:
import { BlogService } from "@/services/BlogService";

const indent = (str: string, spaces: number) =>
  str.split("\n").map((line) => " ".repeat(spaces) + line).join("\n");

export async function GET() {
  const posts = await BlogService.getAllSorted();

  const items = posts.map((post) =>
    indent(
      [
        "<item>",
        `  <title><![CDATA[${post.title}]]></title>`,
        `  <link>https://yuragon.dev/blog/${post.slug}</link>`,
        `  <guid isPermaLink="true">https://yuragon.dev/blog/${post.slug}</guid>`,
        `  <pubDate>${post.date.toUTCString()}</pubDate>`,
        `  <description><![CDATA[${post.description}]]></description>`,
        `  <author>Yurii Khvyshchuk</author>`,
        "</item>",
      ].join("\n"),
      4
    )
  );

  const body = [
    `<?xml version="1.0" encoding="UTF-8"?>`,
    `<rss version="2.0" xmlns:atom="http://www.w3.org/2005/Atom">`,
    `  <channel>`,
    `    <title>yuragon.dev</title>`,
    `    <link>https://yuragon.dev</link>`,
    `    <description>Writing on software engineering by Yurii Khvyshchuk.</description>`,
    `    <language>en-US</language>`,
    `    <atom:link href="https://yuragon.dev/rss.xml" rel="self" type="application/rss+xml" />`,
    ...items,
    `  </channel>`,
    `</rss>`,
  ].join("\n");

  return new Response(body, {
    headers: { "Content-Type": "application/rss+xml; charset=utf-8" },
  });
}
The last piece is letting browsers and crawlers know the feed exists.
Adding it to defaultMetadata generates a <link rel="alternate"> tag in every page <head> automatically:
alternates: {
  canonical: "https://yuragon.dev",
  types: {
    "application/rss+xml": "https://yuragon.dev/rss.xml",
  },
},
This is what feed readers use to auto-discover the RSS URL when someone pastes your homepage into Feedly or a similar app.
Step 7: Open Graph
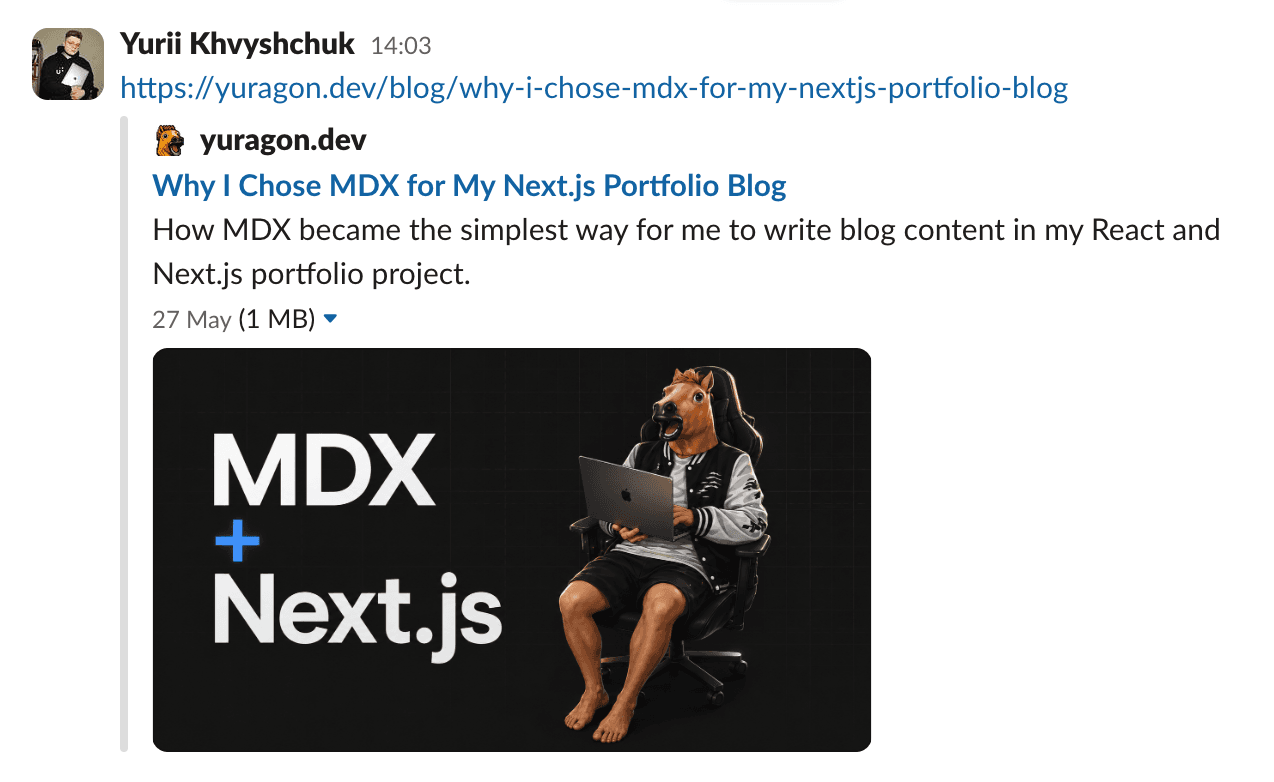
Open Graph is a set of meta tags that control how your page looks when someone shares a link in Telegram, LinkedIn, Twitter, or any app with link previews.

Here is what the raw HTML looks like for a regular page:
<head>
  <meta property="og:type" content="website" />
  <meta property="og:url" content="https://yuragon.dev" />
  <meta property="og:site_name" content="yuragon.dev" />
  <meta property="og:title" content="Yurii Khvyshchuk | Home" />
  <meta property="og:description" content="Software engineer, portfolio and blog." />
  <meta property="og:image" content="https://yuragon.dev/preview.png" />
  <meta property="og:locale" content="en_US" />

  <meta name="twitter:card" content="summary_large_image" />
  <meta name="twitter:title" content="Yurii Khvyshchuk | Home" />
  <meta name="twitter:image" content="https://yuragon.dev/preview.png" />
</head>
For a blog post, the type changes to article and you add a publish date:
<head>
  <meta property="og:type" content="article" />
  <meta property="og:url" content="https://yuragon.dev/blog/simple-jwt-authentication-nodejs" />
  <meta property="og:site_name" content="yuragon.dev" />
  <meta property="og:title" content="Simple JWT Authentication in Node.js" />
  <meta property="og:description" content="A minimal JWT auth flow for Node.js." />
  <meta property="og:image" content="https://yuragon.dev/blog/simple-jwt/cover.png" />
  <meta property="og:locale" content="en_US" />

  <meta property="article:published_time" content="2026-06-02T00:00:00.000Z" />
  <meta property="article:author" content="Yurii Khvyshchuk" />
  <meta property="article:tag" content="Node.js" />
  <meta property="article:tag" content="JWT" />

  <meta name="twitter:card" content="summary_large_image" />
  <meta name="twitter:title" content="Simple JWT Authentication in Node.js" />
  <meta name="twitter:description" content="A minimal JWT auth flow for Node.js." />
  <meta name="twitter:image" content="https://yuragon.dev/blog/simple-jwt/cover.png" />
</head>
In Next.js all of this is generated from the openGraph field in the metadata object.
For the site-wide defaults it lives alongside the rest of defaultMetadata:
export const defaultMetadata: Metadata = {
  // ...
  openGraph: {
    type: "website",
    url: "https://yuragon.dev",
    siteName: "yuragon.dev",
    title: "Yurii Khvyshchuk | Home",
    description: "Yurii Khvyshchuk (yuragon) — software engineer...",
    locale: "en_US",
    images: [{ url: "/preview.png", alt: "Yurii Khvyshchuk" }],
  },
  twitter: {
    card: "summary_large_image",
    title: "Yurii Khvyshchuk | Home",
    description: "Yurii Khvyshchuk (yuragon) — software engineer...",
    images: ["/preview.png"],
  },
};
For blog posts, the OG data is generated dynamically — the cover image and publish date come from each post's frontmatter.
Note that publishedTime must be ISO 8601; passing a human-readable string like "June 2, 2026" silently fails:
export async function generateMetadata({ params }): Promise<Metadata> {
  const post = await BlogService.getBySlug(params.slug);
  const url = `https://yuragon.dev/blog/${post.slug}`;
  const imageUrl = `https://yuragon.dev${post.coverImage}`;

  const allKeywords = [...post.tags, ...post.seoTags];

  return {
    title: post.title,
    description: post.description,
    keywords: allKeywords,
    authors: [{ name: "Yurii Khvyshchuk", url: "https://yuragon.dev" }],
    category: post.tags[0],
    openGraph: {
      type: "article",
      url,
      siteName: "yuragon.dev",
      title: post.title,
      description: post.description,
      images: [{ url: imageUrl, alt: post.title }],
      locale: "en_US",
      publishedTime: post.date.toISOString(),
      authors: ["Yurii Khvyshchuk"],
      section: post.tags[0],
      tags: [...post.tags, ...post.seoTags],
    },
    twitter: {
      card: "summary_large_image",
      title: post.title,
      description: post.description,
      images: [imageUrl],
    },
  };
}
A few things to keep in mind with OG images.
The URL must be absolute and publicly accessible — relative paths like /preview.png work in Next.js metadata (it resolves them against metadataBase), but a fully qualified URL is safer and required for some platforms.
The image must be at least 200×200px — smaller images are ignored.
Telegram prefers 1.91:1 (1200×630), Instagram-like platforms prefer 1:1.
If you pass a list, each platform picks what fits — the first image is the default.
Step 8: Structured Data
Meta tags tell search engines what to display.
Structured data tells them what the page is.
It is a separate, machine-readable layer that uses schema.org vocabulary
and lives inside a <script type="application/ld+json"> tag at the bottom of your HTML.
The user does not see it. Google, Bing, and increasingly LLM crawlers do.
For a personal blog the most useful types are Person (about you),
WebSite (about the domain), BlogPosting (about each article),
and BreadcrumbList (about the navigation path).
They link to each other through @id references so Google
can build a small graph of "this is a site, owned by this person, containing these articles."
That graph is what powers things like the Knowledge Panel that appears
on the right side of Google results for known people,
and the rich result cards with cover image, date, and author that show up for articles.
The most valuable trick here, for me specifically,
was the alternateName field on the Person schema.
My name has many spellings —
Yurii Khvyshchuk, Yura Khvyshchuk, Юрій Хвищук, Юра Хвищук,
plus my handles yuragon and yurkagon.
Putting all of them in alternateName tells Google "these are all the same person",
and a search in any of those forms will start matching this site.
const PERSON_ID = "https://yuragon.dev/#person";

export const personSchema = {
  "@context": "https://schema.org",
  "@type": "Person",
  "@id": PERSON_ID,
  name: "Yurii Khvyshchuk",
  alternateName: ["Юрій Хвищук", "Юра Хвищук", "yuragon", "yurkagon"],
  url: "https://yuragon.dev",
  image: ["https://yuragon.dev/photo/1.jpg", "https://yuragon.dev/photo/2.jpg"],
  jobTitle: "Software Engineer",
  email: "mailto:owngameplay@gmail.com",
  knowsAbout: ["typescript", "react", "next.js", "node.js"],
  sameAs: [
    "https://github.com/yurkagon/",
    "https://www.linkedin.com/in/yurii-khvyshchuk-aa8b07154/",
    "https://www.instagram.com/yurkagon/",
    "https://t.me/yurkagon/",
  ],
};
sameAs links the Person to your social profiles — Google uses them as identity verification.
The WebSite schema below ties the domain to the same person via @id:
export const websiteSchema = {
  "@context": "https://schema.org",
  "@type": "WebSite",
  "@id": "https://yuragon.dev/#website",
  url: "https://yuragon.dev",
  name: "yuragon.dev",
  inLanguage: "en-US",
  author: { "@id": "https://yuragon.dev/#person" },
  publisher: { "@id": "https://yuragon.dev/#person" },
};
For each blog post I generate two more schemas dynamically —
one BlogPosting with the title, image, date, and author,
and one BreadcrumbList so search results can display
the path Home › Blog › Article Title instead of a raw URL.
export const buildBlogPostingSchema = ({
  slug,
  title,
  description,
  date,
  tags,
  seoTags,
  coverImage,
}: BlogPostingSchemaInput) => {
  const url = `https://yuragon.dev/blog/${slug}`;

  return {
    "@context": "https://schema.org",
    "@type": "BlogPosting",
    "@id": `${url}#blogposting`,
    mainEntityOfPage: { "@type": "WebPage", "@id": url },
    headline: title,
    description,
    image: `https://yuragon.dev${coverImage}`,
    datePublished: date.toISOString(),
    author: { "@id": "https://yuragon.dev/#person" },
    publisher: { "@id": "https://yuragon.dev/#person" },
    keywords: [...tags, ...seoTags],
    inLanguage: "en-US",
    url,
    isPartOf: { "@id": "https://yuragon.dev/#website" },
  };
};

export const buildBreadcrumbSchema = (
  items: { name: string; url: string }[]
) => ({
  "@context": "https://schema.org",
  "@type": "BreadcrumbList",
  itemListElement: items.map((item, index) => ({
    "@type": "ListItem",
    position: index + 1,
    name: item.name,
    item: item.url,
  })),
});
To render any schema on a page, I use one small wrapper component that just serializes the object into a <script> tag:
import "server-only";

export const StructuredData = ({ schema }: { schema: object }) => (
  <script
    type="application/ld+json"
    dangerouslySetInnerHTML={{ __html: JSON.stringify(schema) }}
  />
);
The Person schema goes in the root layout.tsx so it appears on every page.
import { StructuredData } from "@/components/StructuredData";
import { defaultMetadata, personSchema } from "@/constants/seo";

export const metadata = defaultMetadata;

export default function RootLayout({ children }) {
  return (
    <html lang="en">
      <body>
        <Header />
        <StructuredData schema={personSchema} />
        <main>{children}</main>
        <Footer />
      </body>
    </html>
  );
}
The WebSite schema sits on the home page.
import { StructuredData } from "@/components/StructuredData";
import { websiteSchema } from "@/constants/seo";

export default function HomePage() {
  return (
    <>
      <StructuredData schema={websiteSchema} />
      {/* page content */}
    </>
  );
}
The BlogPosting and BreadcrumbList schemas sit on individual blog posts.
const blogPostingSchema = buildBlogPostingSchema({
  slug: post.slug,
  title: post.title,
  description: post.description,
  date: post.date,
  tags: post.tags,
  seoTags: post.seoTags,
  coverImage: post.coverImage,
});

const breadcrumbSchema = buildBreadcrumbSchema([
  { name: "Home", url: WEBSITE_URL },
  { name: "Blog", url: `${WEBSITE_URL}/blog` },
  { name: post.title, url: `${WEBSITE_URL}/blog/${post.slug}` },
]);

return (
  <article>
    <StructuredData schema={blogPostingSchema} />
    <StructuredData schema={breadcrumbSchema} />
    {/* ... */}
  </article>
);
Step 9: llms.txt
llms.txt is a new convention — not yet a formal standard, but already adopted by many sites.
It is a plain-text Markdown file that describes your site for AI crawlers like ChatGPT, Perplexity, and Claude.
Instead of making them parse your HTML, styles, and JavaScript to figure out what your site is about,
you give them a clean structured summary: who you are, what pages exist, what each post covers.
Think of it as a sitemap.xml for AI crawlers — same idea, different format.
Here is what it looks like:
# yuragon.dev

> Personal website of Yurii Khvyshchuk (yuragon, yurkagon) — software engineer.

## Pages
- [Home](https://yuragon.dev): Introduction and recent blog posts.
- [About](https://yuragon.dev/about): Background, biography, and personal story.
- [Experience](https://yuragon.dev/experience): Professional experience and career history.
- [Projects](https://yuragon.dev/projects): Portfolio of selected work.
- [Blog](https://yuragon.dev/blog): All posts about software engineering.

## Blog Posts
- [Why I Chose MDX for My Next.js Blog](https://yuragon.dev/blog/why-i-chose-mdx-for-my-nextjs-portfolio-blog): How MDX became the simplest way to write blog content.
- [Simple JWT Authentication in Node.js](https://yuragon.dev/blog/simple-jwt-authentication-nodejs-mongodb): A minimal JWT auth flow for Node.js.

## Contact
- GitHub: https://github.com/yurkagon/
- LinkedIn: https://www.linkedin.com/in/yurii-khvyshchuk-aa8b07154/
In Next.js, create src/app/llms.txt/route.ts and return the file as a plain-text response.
I generate it dynamically so new posts appear automatically without touching the file:
import { BlogService } from "@/services/BlogService";

export async function GET() {
  const posts = await BlogService.getAllSorted();

  const sections = [
    "# yuragon.dev",
    "",
    "> Personal website of Yurii Khvyshchuk (yuragon, yurkagon) — software engineer.",
    "",
    "## Pages",
    "- [Home](https://yuragon.dev): Introduction and recent blog posts.",
    "- [About](https://yuragon.dev/about): Background, biography, and personal story.",
    "- [Experience](https://yuragon.dev/experience): Professional experience and career history.",
    "- [Projects](https://yuragon.dev/projects): Portfolio of selected work.",
    "- [Blog](https://yuragon.dev/blog): All posts about software engineering.",
    "",
    "## Blog Posts",
    ...posts.map(
      (post) => `- [${post.title}](https://yuragon.dev/blog/${post.slug}): ${post.description}`
    ),
    "",
    "## Contact",
    "- GitHub: https://github.com/yurkagon/",
    "- LinkedIn: https://www.linkedin.com/in/yurii-khvyshchuk-aa8b07154/",
  ];

  return new Response(sections.join("\n"), {
    headers: { "Content-Type": "text/plain; charset=utf-8" },
  });
}
The cost is one file. The payoff is that when someone asks an AI "what does Yurii Khvyshchuk write about?", it gets a direct structured answer instead of guessing from HTML.
Nine steps, each targeting a different system: search engines, social platforms, feed readers, AI crawlers. None of them alone changes much. Together they make sure the site is readable by everything that matters.
Step 10: PageSpeed Insights
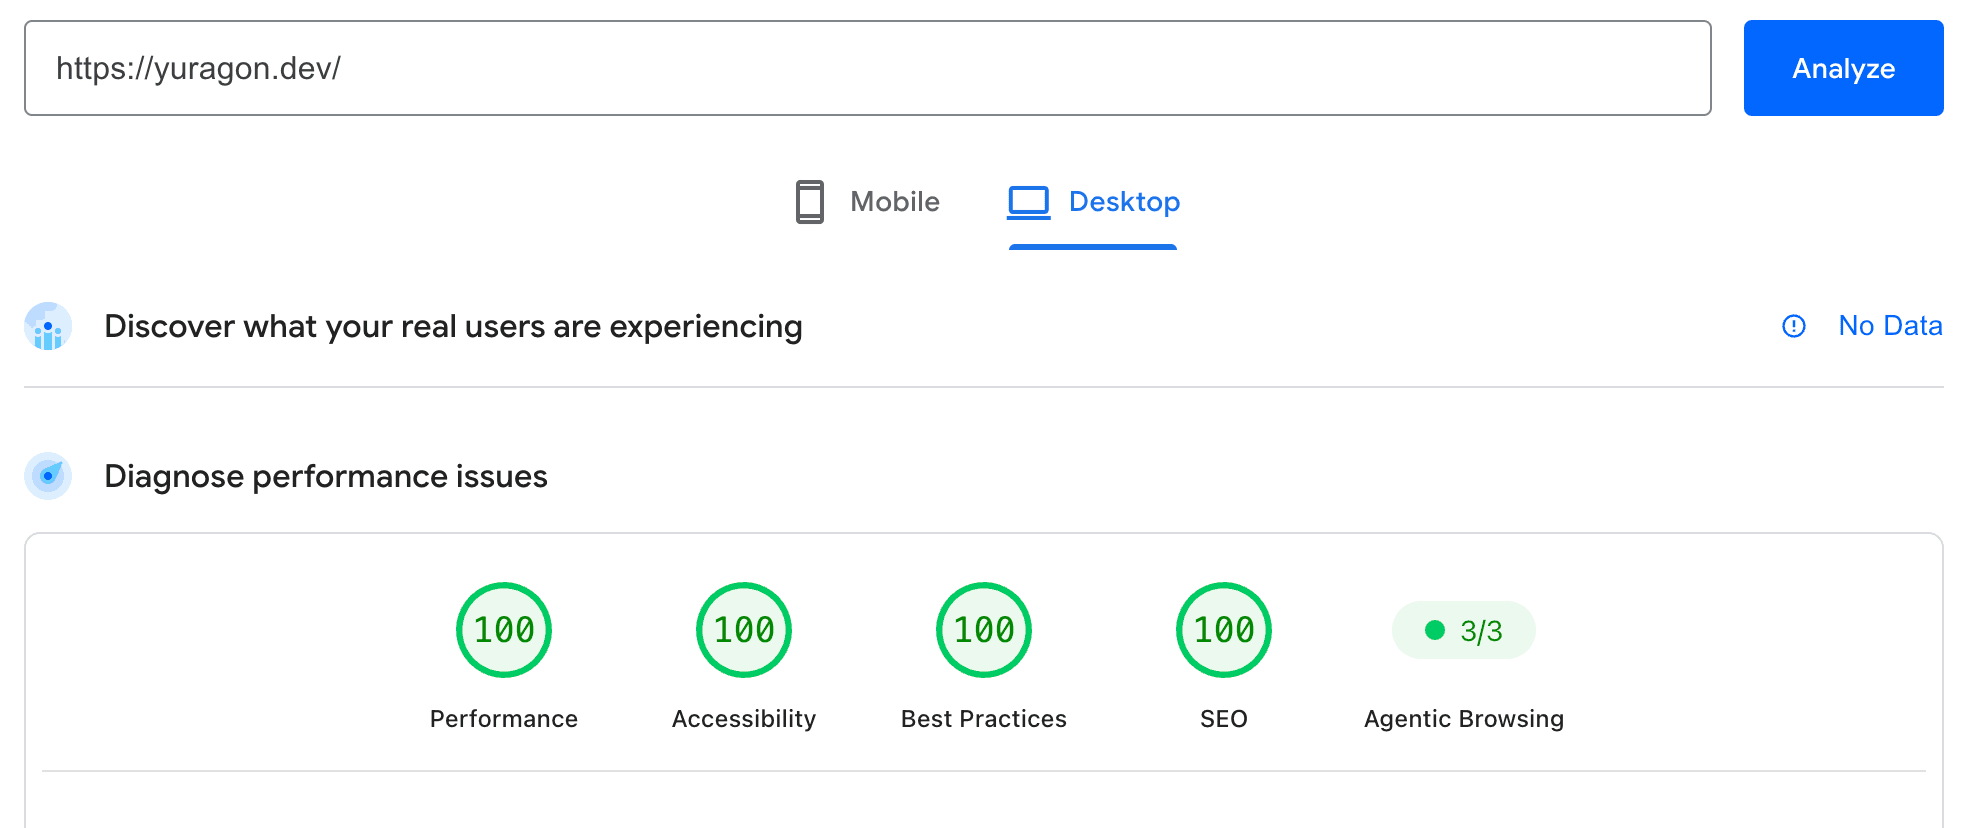
Once the technical setup is done, it is worth running your site through PageSpeed Insights. It audits performance, accessibility, best practices, and SEO — and gives each category a score from 0 to 100.
The SEO score specifically checks things like meta tags, crawlability, mobile-friendliness, and structured data. A low score there usually points to something concrete you missed. A high score confirms the basics are in place.
It is not a guarantee of ranking, but it is a fast sanity check that costs nothing.
What is Next
The technical part is done. The one remaining step is adding the site to Google Search Console. It does not change how Google finds you — crawlers will discover the site on their own eventually. But Search Console lets you submit the sitemap directly and trigger indexing for new posts manually, which is the difference between a post appearing in search after a few hours versus a few weeks. It also shows you which queries bring people to your site, which pages have errors, and whether the structured data is being picked up correctly. That feedback is what tells you if any of this actually worked.
That is everything. Semantic HTML, meta tags, sitemap, robots, Open Graph, structured data, llms.txt — each piece is a few lines of code. None of them do much alone. Together they cover every system that might discover your site: search engines, social platforms, AI crawlers.